This website is preserved for historical and scholarly reference and is no longer actively maintained.
2.2 Playing around with the Watch Example
To start the tour of the watch example, open the Graph Browser
from the MetaEdit+ main launcher. All models related to the watch example are
now shown on the
Graphs list. Choose the ‘2004Models’
WatchFamily diagram from the list and open it in the Diagram Editor either by
double-clicking or by selecting open from the pop-up menu (as shown in
Figure 2-1).
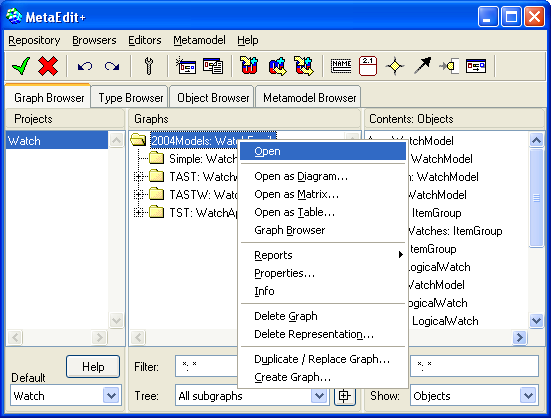
Figure 2-1. Opening a WatchFamily diagram.
The
‘2004Models’ WatchFamily diagram
(
Figure 2-2) presents a family of related
wristwatch models. In the diagram, the actual models are shown in the
Models group at the top of the diagram, while the logical watch
application and display components are presented in the two groups at the bottom
of the diagram. To access the properties of a model element, double-click it or
select it and choose
Properties... from its pop-up menu.
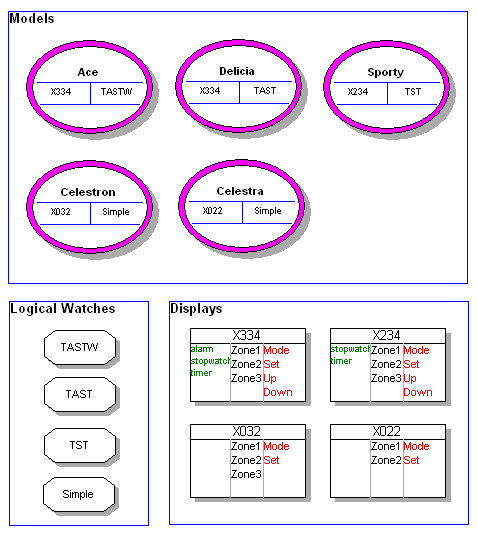
Figure 2-2. The ‘2004Models’ WatchFamily diagram.
To
further explore the watch example, let us take a look at how the logical watch
applications have been constructed. Choose the one called ‘TASTW’
from the
Logical Watches group, select
Decomposition... from the
pop-up menu and
Open from the following dialog (or, simply double-click
‘TASTW’ while holding down the Ctrl-key). This will open the
‘TASTW’ WatchApplication diagram as shown in
Figure 2-3 (you could also have opened
this diagram from the Graph Browser).
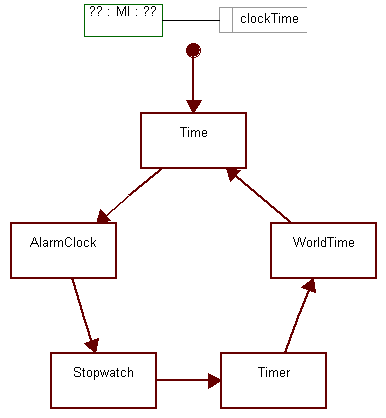
Figure 2-3. The ‘TASTW’ WatchApplication diagram.
This
diagram shows the configuration of the logical watch application. It only
contains the top-level logical configuration of sub-applications, basically
showing which sub-applications have been included into this specific logical
watch and in which order they are invoked. When the logical watch application is
started (i.e. the watch is powered up), the basic Time sub-application will be
invoked. If this sub-application is exited, a Stopwatch sub-application will be
started. The cycle is completed when the Time will be re-activated when exiting
from WorldTime sub-application. The name ‘TASTW’ comes from these
sub-applications’ initials in order. To see how the sub-applications have
been defined, choose one and open its decomposition graph by selecting
Decompositions... from its pop-up menu and then Open from the
following dialog (or, by double-clicking the sub-application element while
holding down the Ctrl-key).
Now we are ready to generate the code of the test
environment for our watch models. Close all WatchApplication diagrams and go
back to the WatchFamily diagram. Before we run the generation, we have to define
the target platform for which the code will be generated. Select Graph |
Properties... in the WatchFamily Diagram Editor and choose the OS you are
running on (Windows or Linux) as the Generation target platform in the
dialog that opens (choices for MIDP and API are covered in chapters 4 and 5).
Also make sure that you have the correct version of the J2SE installed in the
directory described at the beginning of this document.
To invoke the code generation, select
Graph | Reports |
Run... (or press
Run Report button in Diagram Editor toolbar) and
choose ‘Autobuild’ from the list that opens. This will execute a
report that generates the Java code for all watch models and will compile and
start the test environment in a web browser (as shown in
Figure 2-4).
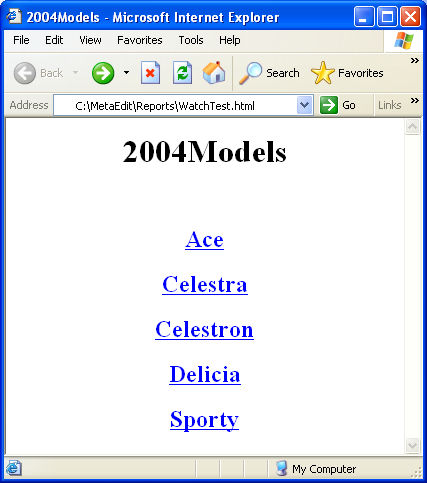
Figure 2-4. The watch test environment.
To test a watch
model, choose it from the web page to open its test environment. In the watch
test environment (as shown in
Figure 2-5)
you can test the watch as it would appear in real life by pressing the buttons
and observing the behavior of zones and icons on the display. The current
application and its state are always shown lower down on the page for debugging
purposes.
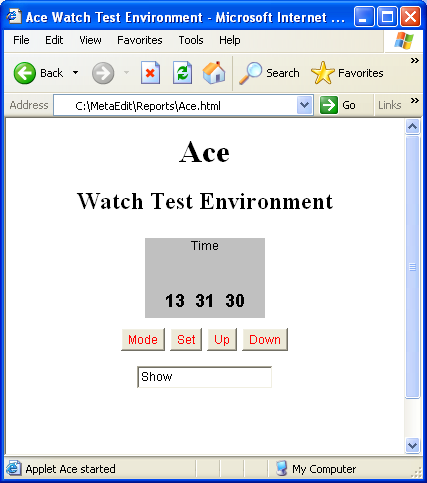
Figure 2-5. The test environment for a watch model.
It is
also possible to generate a test environment for just some selected watch
models. To do this, open the graph properties dialog for
‘2004Models’ WatchFamily diagram and add the desired watch models
into the Selected models list by selecting Add Existing... from
the pop-up menu of the list and choosing the appropriate watch models from the
dialog that opens. When the models have been added to the Selected models
list, run the ‘Autobuild’ report as explained previously.
Along with the Java code for the Watch test environment it
is also possible to generate the technical documentation directly from the Watch
models. To try this feature out, run the report called ‘Watch family
documentation’. The report output will be shown in the web browser with
clickable pictures and hypertext links.


